NVR local interface - Settings: AI/Event
Here you review video that the AI flagged.
- Event Notification
- AI Event
- General Event
- Alarm Status
Event Notification page
Alarm-out
This table lists all the alarms coming from the NVR and cameras. From here you can set delays to the alarm (allowing, for example, an employee time to enter a passcode), select or set a schedule, and set whether the alarm is normally open or closed.
The Test button activates the alarm-out on the camera.
This displays a table of people who receive email alerts from alarms. You can edit the schedule for a recipient in the table, or delete them outright.
To add a person, click Add to open a dialog where you enter their email, select the schedule during which they'll receive notifications, and click Add to close the dialog.
At the bottom, you can click the eye toggle to hide or reveal the sender's email address.
Edit Sender takes you to the Network > Email page.
Schedule Management: This opens the Schedule dialog. Three schedules are preset for the system. The first is the default 24×7 schedule. This cannot be edited or deleted.
The other two default to weekdays (24×5) and weekends (24×2), but can be edited and renamed to fit install needs. Click Add above the schedule list to add a new schedule.
Click Edit to open the Edit Schedule dialog. Rename the schedule at the top. Click Erase or Add to modify the schedule bars. Click and drag in a schedule bar to add or erase times.
Apply saves all changes.
Display
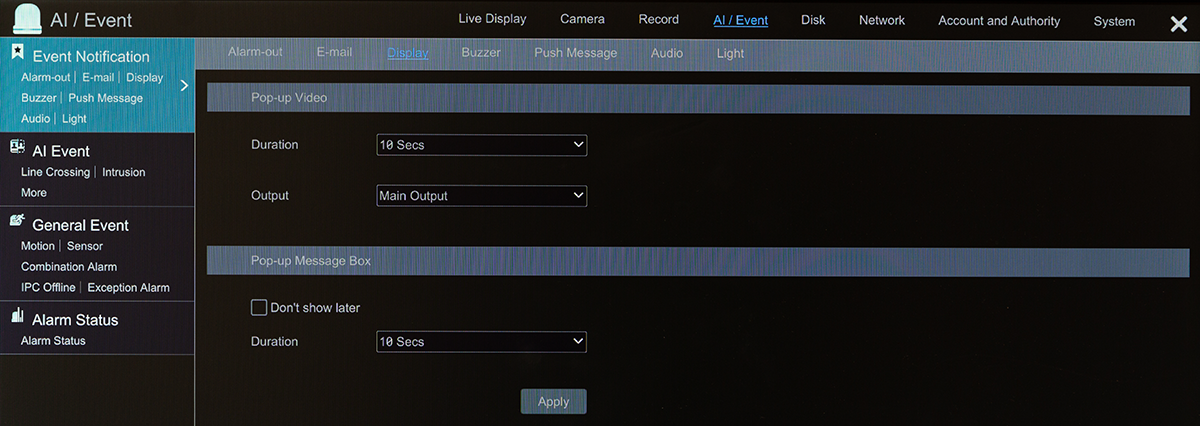
Here you set how alert messages behave on the Live View page.
You can set the duration of a pop-up alert video, as well as message alerts. The Always Keep option sets the window to stay until dismissed.
Enable Don't Show Later if you don't want the popup to appear on the display.
Buzzer
Here you set the duration time of the audio alarm for the NVR. Click Apply to save, and Test to hear it.
Push Message
Check Enable to send push messages to the mobile clients. Select the push schedule and then click Apply to save the settings. If the push server is online, it sends notifications of alerts to the Luma View app.
Schedule Management: This opens the Schedule dialog. You can have up to three schedules for the system. The first is the default 24×7 schedule. This cannot be edited or deleted.
The other two default to weekdays (24×5) and weekends (24×2), but can be edited and renamed to fit the needs.
When you click Edit, it opens to the Edit Schedule dialog. At the top you can rename the schedule. Click Erase or Add to modify the schedule bars. Click and drag in a schedule bar to add or erase times.
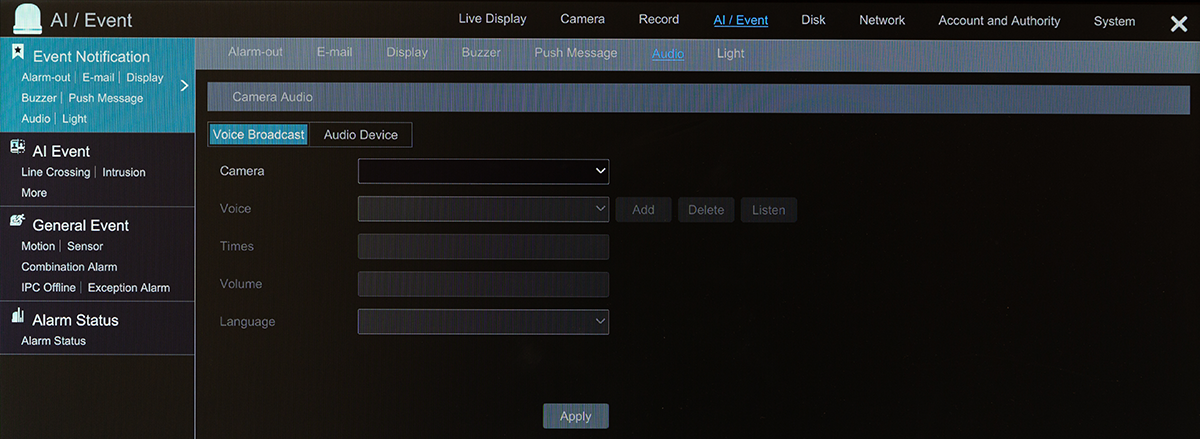
Audio
Voice Broadcast panel
Audio Device panel
Here you set parameters for any audio devices you have attached to the system.
Select the camera and click Enable to use audio input from the specified camera (or its attached gear). Select the input device and volume.
Below that, set the parameters for any audio output device attached to that camera. Click Alarm Play to make the audio device play a recording , or Talkback to allow for live interaction with the people at the camera. Finally, choose the output volume and encoding.
Light
AI Event page
Here you set the parameters for AI analysis. There are four tabs to this page, two under People/Vehicle Detection, and two under More.
At the very top (above the tabs), use the dropdown to select a camera for AI configuration. Each camera can have either line crossing or area intrusion enabled; it cannot have both enabled at the same time.
Line Crossing tab
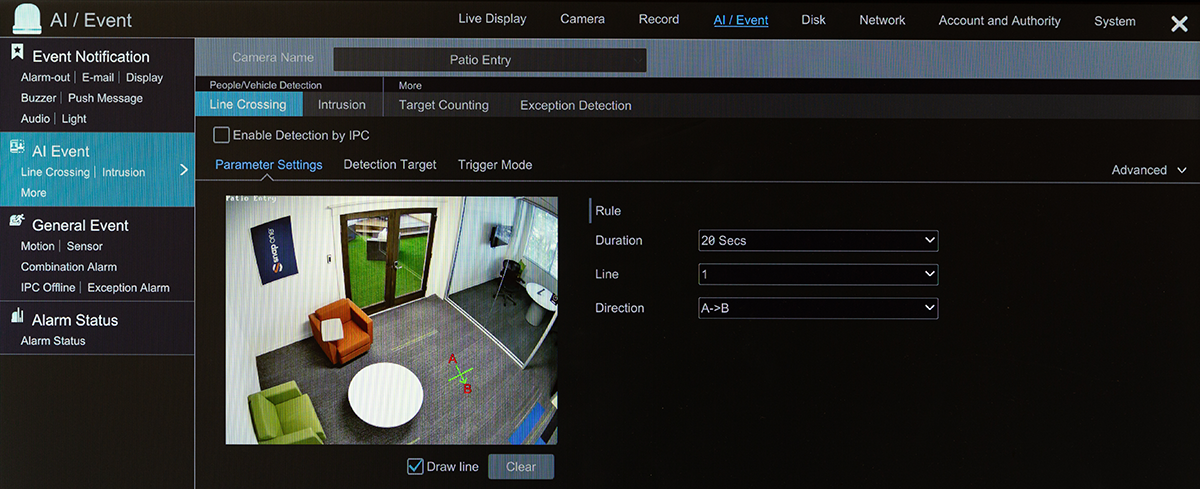
The camera can use AI to determine whether something crosses a line. Line crossing cannot be used if area intrusion is being used. You must click Enable Detection by IPC to activate this feature.
Parameter Settings
Here you create the lines to check, and the detection rules for each. Set the rules at the right before drawing your lines.
-
Duration: The length of time assumed for one line crossing incident. Once an event is reported, no additional incidents will be reported for that long.
-
Line: Select which of the 4 lines you want to modify.
-
Direction: Select the direction(s) of movement you want to evaluate.
To create a line, click Draw Line below the camera image. Click and drag in the camera view image to create the line. You cannot edit a drawn line; you must draw it anew.
Click Clear to delete the selected line.
Note the arrow in the camera image, and the selection in the Direction dropdown. The camera checks for line crossings in that direction only. You can change the dropdown selection to reverse the direction.
Detection Target
You can set the camera to look for people, motor vehicles, and/or non-motor vehicles, and set the sensitivity for each type separately. Low sensitivity generates fewer results, including (possibly) missing some valid ones. High sensitivity generates more results, including (potentially) false positives.
Trigger Mode
At the left, you can set the camera to
-
Take a Snapshot
-
Send a Push notification
-
Activate the Buzzer on the NVR.
-
Open a Pop-up Video
-
Send an E-mail alert
-
Activate the Camera Audio - Active Deterrent (not available for all cameras)
-
Activate the Camera Light - Active Deterrent (not available for all cameras)
Click the Trigger General checkbox on the table header to enable all events.
To the right, you can enable the camera to Record the event, activate an Alarm-out, and/or send other PTZ cameras to a Preset.
Advanced
This is a dropdown to the right. Here you can select for the camera to Save original picture (the entire screen) or Save target picture (cropped to the item that triggered the event) on the SD card of the camera. These settings only affect this event mode.
Intrusion tab
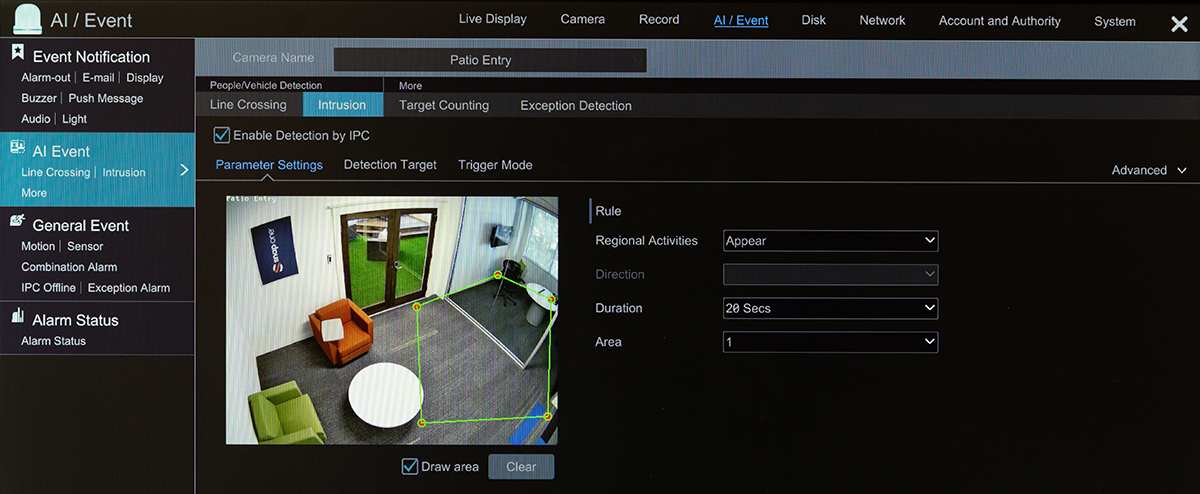
The camera can use AI to determine whether something crosses a line. Line crossing cannot be used if area intrusion is being used. You must click Enable Detection by IPC to activate this feature.
Parameter Settings
Here you create the areas to check, and the detection rules for each. Set the rules at the right before drawing your areas.
-
Regional Activity and Direction are disabled at this time, but have been left for future compatibility.
-
Duration: The length of time assumed for one intrusion incident. Once an event is reported, no additional incidents will be reported for that long.
-
Area: select which of the 4 areas you want to modify.
Below the camera image, click Draw Area. Click in the camera view image to set up to six corners for the area. You cannot edit a drawn area; you must create it anew. If your shape has fewer than six corners and you click away from the image, the NVR completes the shape for you. If you click back in the image window, the NVR adds a new corner, connecting it to the previous corner.
Click Clear to delete the selected area.
Detection Target
You can set the camera to look for people, motor vehicles, and/or non-motor vehicles, and set the sensitivity for each type separately. Low sensitivity generates fewer results, including (possibly) missing some valid ones. High sensitivity generates more results, including (potentially) false positives.
Trigger Mode
At the left, you can set the camera to
-
Take a Snapshot
-
Send a Push notification
-
Activate the Buzzer on the NVR.
-
Open a Pop-up Video
-
Send an E-mail alert
-
Activate the Camera Audio - Active Deterrent (not available for all cameras)
-
Activate the Camera Light - Active Deterrent (not available for all cameras)
Click the Trigger General checkbox on the table header to enable all events.
To the right, you can enable the camera to Record the event, activate an Alarm-out, and/or send other PTZ cameras to a Preset.
Advanced
This is a dropdown to the right. Here you can select for the camera to Save original picture (the entire screen) or Save target picture (cropped to the item that triggered the event) on the SD card of the camera. These settings only affect this event mode.
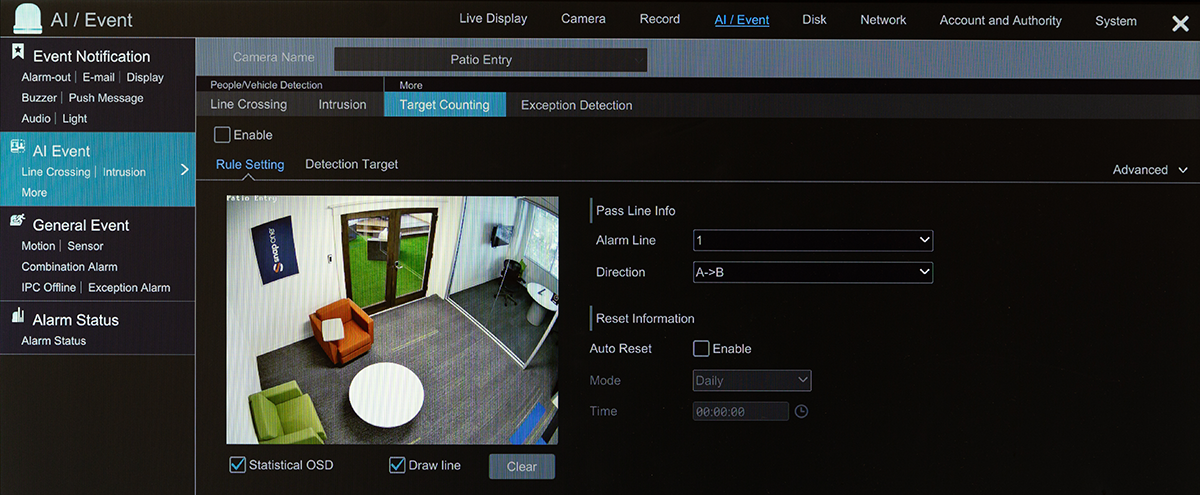
Target Counting tab
The camera can use AI to determine whether something crosses a line, and then keeps a running tally of the number of times this occurs.
Rule Setting
Here you create a line to check for crossing, and its detection rules. Set the rules at the right before drawing your line.
Beneath the Pass Line Info, you set the following:
-
Alarm line: Yes, there's only one.
-
Direction: Select the direction(s) of movement you want to count.
The section labeled Reset Information allows you to periodically start the count over. If you want to do this, enable Auto Reset. Under Mode, choose whether you want it reset daily, weekly (you must choose a day of the week), or monthly (you must choose a date of the month).
Finally, choose when it resets under Time.
If you do not want an auto reset, you can reset it yourself by clicking the Manual Reset button at the bottom right of the window.
Below the camera image, click Enable Statistical OSD to display the current count on the video feed.
To create a line, click Draw Line below the camera image. Click and drag in the camera view image to create the line. You cannot edit a drawn line; you must draw it anew.
Click Clear to delete the selected line.
Note the arrow in the camera image, and the selection in the Direction dropdown. The camera checks for line crossings in that direction only. You can change the dropdown selection to reverse the direction.
Detection Target
You can set the camera to look for people, motor vehicles, and/or non-motor vehicles, and set the sensitivity for each type separately. Low sensitivity generates fewer results, including (possibly) missing some valid ones. High sensitivity generates more results, including (potentially) false positives.
Advanced
This is a dropdown to the right. Here you can select for the camera to Save original picture (the entire screen) or Save target picture (cropped to the item that triggered the event) on the SD card of the camera. These settings only affect this event mode.
In addition, you can set the NVR to send count notifications.
-
Send Mode: Choose how frequently, as well as the day of the week or day of the month, as appropriate.
-
Time: When the email should send.
-
Recipients drawn from the list of emails in the system.
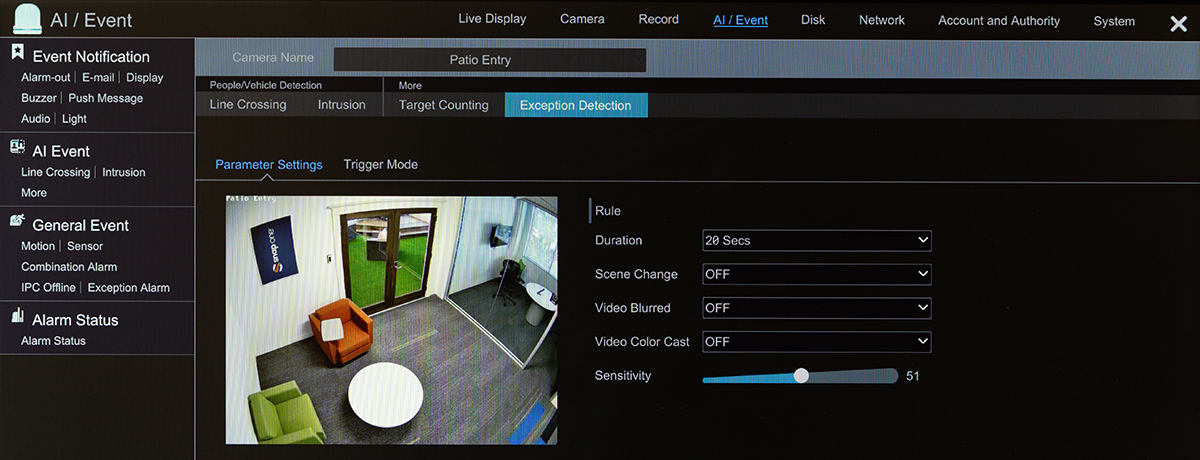
Exception Detection tab
Here you set up what the NVR does when something appears to interferer with your cameras.
Parameter Settings
Duration: The length of time assumed for one exception incident. Once an event is reported, no additional incidents will be reported for that long.
There are three disruptions your NVR can scan for.
-
Scene Change: The camera abruptly shows a different image.
-
Video Blurred: The camera image loses focus.
-
Video Color Cast: The colors shown on the camera feed change to a different hue. This can often be caused by a change in lighting.
Set the Sensitivity slider to adjust how small a change is needed to cause an alert.
Trigger Mode
At the left, you can set the camera to
-
Take a Snapshot
-
Send a Push notification
-
Activate the Buzzer on the NVR.
-
Open a Pop-up Video
-
Send an E-mail alert
-
Activate the Camera Audio - Active Deterrent (not available for all cameras)
-
Activate the Camera Light - Active Deterrent (not available for all cameras)
Click the Trigger General checkbox on the table header to enable all events.
To the right, you can enable the camera to Record the event, activate an Alarm-out, and/or send other PTZ cameras to a Preset.
General Event page
These handle non-AI events.
Motion
Here you select which cameras detect basic motion, and what they do when motion is detected. Note that this is prone to false alarms; for example, a lightning flash will trigger a basic motion event.
For each camera, set its schedule, which other cameras the motion event triggers to record and/or take a snapshot, which non-surveillance events it triggers, and whether it sends push or email notifications.
The available alert options are:
-
Record: This opens a pop-up window where you select cameras to begin recording (trigger cameras) when the alarm is sent.
-
Snapshot: This opens a pop-up window where you select cameras to a photo of the camera's view (trigger cameras) when the alarm is sent. For PTZ cameras, this is taken after moving to its preset, below.
-
Push: This sends a text to the numbers configured Push Message.
-
Alarm-out: When you enable this, it opens the Alarm Out dialog box where you can configure the alarm it uses; click the Configure button if you need to edit it later. To use this, you must set the delay time and schedule of the alarm outputs Alarm-out.
-
Preset: For PTZ cameras, move it to a predetermined orientation and zoom.
-
Buzzer: This is the audio alert built into the NVR itself. Set the delay time of the buzzer Buzzer.
-
Pop-up Video: Displays the camera's live view in a pop-up window. Set the duration of the video Display.
-
E-mail: Sends a message to the emails that were Email.
You can enable alerts for each exception individually, or enable them for all exceptions using the header row of the table.
At the bottom, click the Motion Settings button to jump to Motion page.
Sensor
For each sensor, set its schedule, which cameras the sensor triggers to record and/or take a snapshot, and what non-surveillance events it triggers.
The available alert options are:
-
Record: This opens a pop-up window where you select cameras to begin recording (trigger cameras) when the alarm is sent.
-
Snapshot: This opens a pop-up window where you select cameras to a photo of the camera's view (trigger cameras) when the alarm is sent. For PTZ cameras, this is taken after moving to its preset, below.
-
Push: This sends a text to the numbers configured Push Message.
-
Alarm-out: When you enable this, it opens the Alarm Out dialog box where you can configure the alarm it uses; click the Configure button if you need to edit it later. To use this, you must set the delay time and schedule of the alarm outputs Alarm-out.
-
Preset: For PTZ cameras, move it to a predetermined orientation and zoom.
-
Buzzer: This is the audio alert built into the NVR itself. Set the delay time of the buzzer Buzzer.
-
Pop-up Video: Displays the camera's live view in a pop-up window. Set the duration of the video Display.
-
Pop-up Message Box: Displays a message on the video screens. Set the duration time of the message box Display.
-
E-mail: Sends a message to the emails that were Email.
You can enable alerts for each exception individually, or enable them for all exceptions using the header row of the table.
Click Apply to save changes.
Combination Alarm
For each system, set its schedule, which cameras the system triggers to record and/or take a snapshot, and what non-surveillance events it triggers.
The available alert options are:
-
Combination Alarm: This triggers a recording when two or more alarms trigger at the same time. For example, motion and a smart event both trigger.
-
Record: This opens a pop-up window where you select cameras to begin recording (trigger cameras) when the alarm is sent.
-
Snapshot: This opens a pop-up window where you select cameras to a photo of the camera's view (trigger cameras) when the alarm is sent. For PTZ cameras, this is taken after moving to its preset, below.
-
Push: This sends a text to the numbers configured Push Message.
-
Alarm-out: When you enable this, it opens the Alarm Out dialog box where you can configure the alarm it uses; click the Configure button if you need to edit it later. To use this, you must set the delay time and schedule of the alarm outputs Alarm-out.
-
Preset: For PTZ cameras, move it to a predetermined orientation and zoom.
-
Buzzer: This is the audio alert built into the NVR itself. Set the delay time of the buzzer Buzzer.
-
Pop-up Video: Displays the camera's live view in a pop-up window. Set the duration of the video Display.
-
Pop-up Message Box: Displays a message on the video screens. Set the duration time of the message box Display.
-
E-mail: Sends a message to the emails that were Email.
You can enable alerts for each exception individually, or enable them for all exceptions using the header row of the table.
Click Apply to save changes.
IPC Offline
For each camera, set its schedule, which cameras the event triggers to record and/or take a snapshot, and what non-surveillance events it triggers.
The available alert options are:
-
Snapshot: This opens a pop-up window where you select cameras to a photo of the camera's view (trigger cameras) when the alarm is sent. For PTZ cameras, this is taken after moving to its preset, below.
-
Push: This sends a text to the numbers configured Push Message.
-
Alarm-out: When you enable this, it opens the Alarm Out dialog box where you can configure the alarm it uses; click the Configure button if you need to edit it later. To use this, you must set the delay time and schedule of the alarm outputs Alarm-out.
-
Preset: For PTZ cameras, move it to a predetermined orientation and zoom.
-
Buzzer: This is the audio alert built into the NVR itself. Set the delay time of the buzzer Buzzer.
-
Pop-up Video: Displays the camera's live view in a pop-up window. Set the duration of the video Display.
-
Pop-up Message Box: Displays a message on the video screens. Set the duration time of the message box Display.
-
E-mail: Sends a message to the emails that were Email.
You can enable alerts for each exception individually, or enable them for all exceptions using the header row of the table.
Click Apply to save changes.
Exception Alarm
Here you set what the NVR does to notify you when the surveillance system is not operating properly. Click Apply to save changes.
The exceptions are:
-
IP Address Conflict: This alter triggers if you set up the network with a duplicate address for the NVR.
-
Disk IO Error: The hard drive reports an inability to read or write.
-
Disk Full: There is no more space, and overwrite has not been enabled.
-
No Disk: There is no hard drive in the NVR when it boots up.
-
Illegal Access: This alerts you to when someone enters an incorrect password in the local UI.
-
Network Disconnection: The NVR cannot find the network gateway.
-
HDD Is Pulled Out: A hard drive that previously existed cannot be reached.
The available alert options are:
-
Push: This sends a text to the numbers configured Push Message.
-
Alarm-out: When you enable this, it opens the Alarm Out dialog box where you can configure the alarm it uses; click the Configure button if you need to edit it later. To use this, you must set the delay time and schedule of the alarm outputs Alarm-out.
-
Buzzer: This is the audio alert built into the NVR itself. Set the delay time of the buzzer Buzzer.
-
Pop-up Message Box: Displays a message on the video screens. Set the duration time of the message box Display.
-
E-mail: Sends a message to the emails that were Email.
You can enable alerts for each exception individually, or enable them for all exceptions using the header row of the table.
Alarm Status page
Here you review your alarms to ensure everything is operating properly. You can reach this page by clicking the alarm icon at the bottom of the Live View page.
If the interface shows a number in a red circle, click the chevron at right for details on that issue. If there are more than one page of alerts, you can either click the arrows at the bottom no navigate the pages, or enter a number in the text box and then click the right arrow to jump to that specific page.


